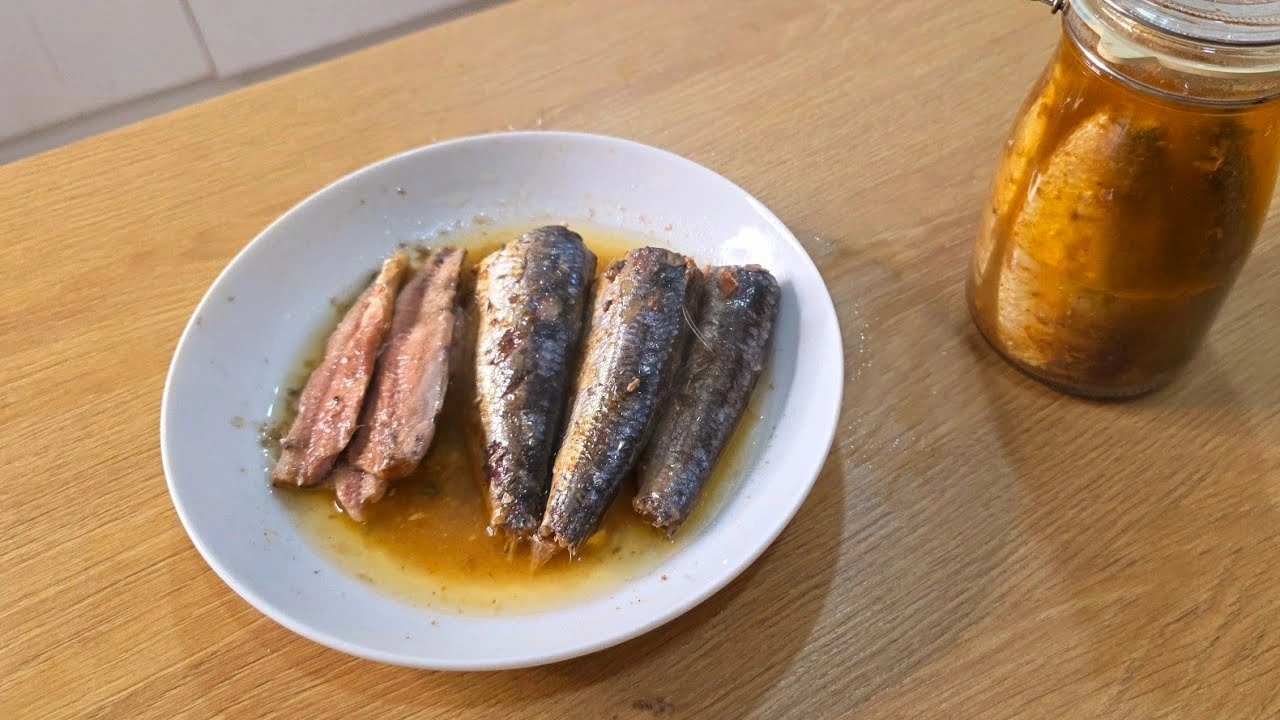
Gourmet Homemade Canned Sardines
About Recipe
Homemade canned sardines are a true game-changer, offering a sensory experience that commercial brands simply cannot match. The moment you pop open that jar, you are greeted by the rich, aromatic infusion of high-quality oil, pungent garlic, and earthy bay leaves. The sardines emerge perfectly intact yet incredibly tender, with a texture that rivals the finest gourmet preserves.
This method focuses on meticulous cleaning and descaling without splitting the belly, ensuring each fish maintains its professional appearance and firm yet buttery bite. Imagine the magic that happens during a slow, five-hour gentle water bath; the oil permeates the flesh, transforming it into a decadent delicacy. Beyond the incredible taste, there is a profound satisfaction in knowing exactly what goes into your food—no mysterious preservatives.
Packing the sardines vertically in the jar allows the flavors to distribute evenly, while a touch of white vinegar adds a subtle, bright acidity that balances the richness of the fish. It is an economical masterpiece, where a single kilogram yields several jars of premium-quality seafood at a fraction of the market price. Once you taste the depth of flavor and the clean finish of these home-preserved sardines, you will never look at a store-bought can the same way again.
Instructions
Easy steps for an amazing result
Sardine Preparation and Cleaning
Scale the sardines thoroughly and remove all scales, then wash and drain completely.
Carefully separate the head from the body: cut with a knife near the gills and pull the head outward to drag out all the entrails without opening the fish's belly.
Cut off the tails so the sardines fit well in the jar, then give them a final rinse and ensure they are perfectly clean inside.
Seasoning and Packing
Mix some salt with chili powder (or paprika), sprinkle over the sardines, and mix well by hand.
Prepare sterilized and completely dry glass jars, and place a pinch of salt and chili at the bottom of each.
Pack the sardines vertically in the jar (side by side) with the head end down and the tail end up.
Add two small garlic cloves and two bay leaves to each jar for flavor.
Pour oil until it covers all the sardines, leaving a small space for one tablespoon of vinegar at the end.
Canning Process
Seal the jars very tightly, then wrap each jar in a freezer bag followed by aluminum foil to ensure no air entry.
Place a kitchen towel at the bottom of a large pot and arrange the jars on it, then pour boiling water until it reaches three-quarters of the jar height.
Place the pot over medium heat until it boils once, then reduce to very low heat (like simmering beans) and leave for 5 to 6 hours.
Let the jars cool completely in the water before taking them out and opening them.
Chef Secrets
Simple tricks to make your dish special
Do not open the sardine's belly; pulling the guts from the head keeps the fish intact and looking professional.
You must place a towel under the jars in the pot to prevent them from breaking during boiling.
Use very low heat during cooking; the secret is in the slowness so the bone softens and the meat absorbs the oil.
Ensure the jars are completely dry before packing to prevent the sardines from spoiling.
Packing sardines vertically allows you to fit more and ensures even heat distribution.
You can let the sardines cool in their water overnight before storing them.
Serve with warm Baladi bread, green onions, and arugula for a truly rustic meal.
You can mash it to make a sardine salad with tahini and vegetables.
Serving Suggestions
A final touch for a complete meal
Serve with warm Baladi bread, green onions, and arugula for a truly rustic meal.
You can mash it to make a sardine salad with tahini and vegetables.
Frequently asked questions
Practical answers on prep, storage, and substitutions
So that the texture is smooth and melts in your mouth immediately; scales aren't pleasant in homemade canned sardines.
Keywords
Spongy Yogurt Cake (Naiti Style)
Fluffy and airy Yogurt Sponge Cake that tastes just like the classic Naiti! Master this foolproof recipe for a high-rising, soft cake perfect for your daily tea time.
Healthy Whole Wheat Toast & Petit Pain
Homemade whole wheat toast and petit pain recipe with bran, following the. Healthy, economical, dairy-free, and easy to bake.
Authentic Egyptian Koshari with All the Secrets
Learn how to make authentic Egyptian Koshari with crispy onions, savory tomato sauce, garlic vinegar Daqqa, and spicy oil like a pro.

Magic Dough Brioche (Manjakouna)
Learn to make fluffy Egyptian Brioche (Manjakouna) with a magic dough. An easy, economical recipe for light, cloud-like pastries.
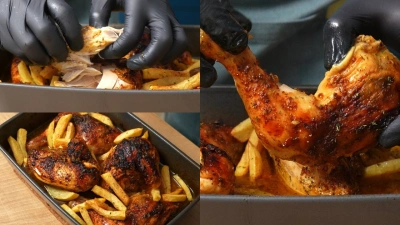
Classic Egyptian Roasted Chicken Tray
Master the Egyptian roasted chicken tray with a potent marinade and crispy skin. Discover the secret to the perfect savory sauce and juicy, butter-soft chicken.
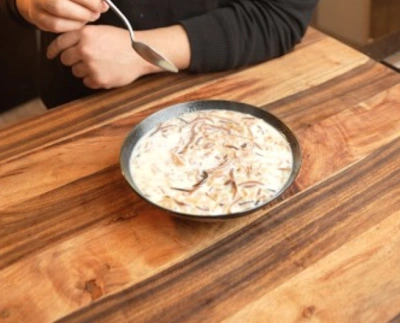
Traditional Upper Egyptian Vermicelli with Ghee and Milk
Warm up with traditional Upper Egyptian Vermicelli. A handcrafted 10-minute dessert with ghee and milk that brings authentic Egyptian comfort to your table.

Authentic Egyptian Shakshuka
Master authentic Egyptian Shakshuka! Enjoy a rich, simmered tomato and pepper sauce with perfectly cooked eggs. The ultimate flavorful breakfast ready in 25 minutes.

Authentic Kebab El Halla and White Rice with Mastic and Cardamom
Master the authentic Egyptian Kebab El Halla: tender beef in a rich caramelized onion sauce. Served with aromatic mastic and cardamom rice for a perfect meal.