Magic Dough Brioche (Manjakouna)
About Recipe
The aroma of baking bread at home always brings back memories of family gatherings and nostalgic moments, and Brioche, or as we call it "Manjakouna," is the star of those cherished mornings. Imagine a dough as soft as clouds, pale in color, with a scent that fills the room, and when you tear it apart, you see that beautiful elastic texture that speaks of perfect kneading. This Brioche isn't just a pastry; it's a story told with sugar and butter, starting from the moment we mix flour with yeast, eggs, and warm milk, letting them rest until they double in size.
In today's "Magic Dough" recipe, we'll discover how to make Brioche or "Freeska" just like the finest professional bakeries, but even better. The secret lies in proper kneading and patient proofing, ensuring each piece is light as a feather and melts in your mouth. Whether you choose to brush them with melted butter and a sprinkle of sugar while hot, or just a simple milk wash for a delicate finish, the result will amaze you and keep you coming back for more.
It’s an authentic Egyptian recipe with a modern touch, perfect for breakfast with a cup of tea or a light snack throughout the day. The ingredients are simple and found in every kitchen, but the taste is truly luxurious and heartwarming. Give it a try, and you'll smell the scent of happiness in every corner of your kitchen, feeling a great sense of joy when you see the dough succeed perfectly from the first attempt, because this Brioche is truly made with love to delight everyone who tastes it.
Instructions
Easy steps for an amazing result
Preparing the Dough
In a large bowl, mix the flour with salt, sugar, instant yeast, and baking powder.
Add the eggs and vanilla, then gradually pour in the warm milk and oil.
Knead the ingredients very well until a smooth and soft dough forms. If it's too sticky, you can add a tablespoon of flour until it comes together.
Test the dough by stretching a piece; if it doesn't break easily, it's kneaded correctly. Gather it with a tablespoon of oil and place it in a greased bowl.
Cover the dough and let it proof in a warm place (like an off oven with the light on) until it doubles in size.
Shaping and Second Proofing
Divide the dough into 20 equal pieces.
Take each piece, roll it out, and shape it into a spiral or the traditional brioche shape.
Arrange the pieces on baking trays, cover them, and let them rise for a second time for about 40 minutes.
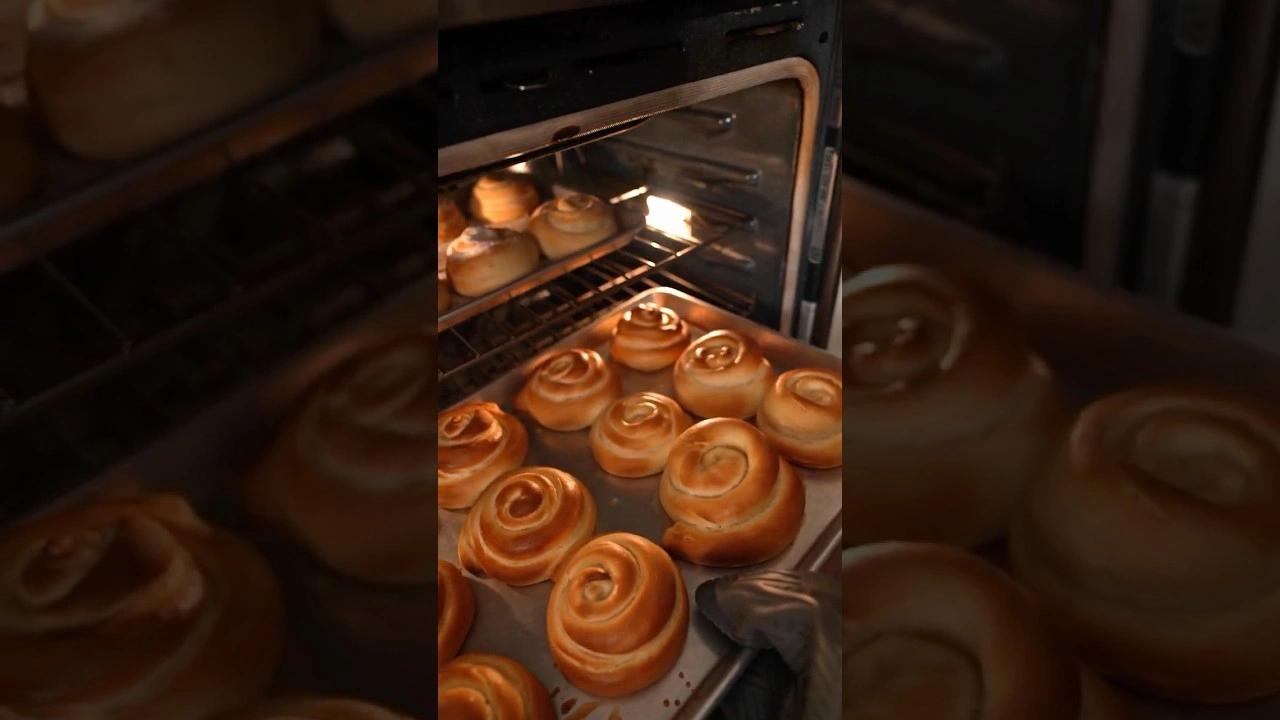
Baking and Finishing Touches
Brush the tops of the brioche with liquid milk using a brush.
Place the trays in a preheated oven at 200°C for 15 minutes until they turn golden on top and bottom.
For those who like sugar: sprinkle granulated sugar on top while still hot.
Brush the brioche with melted butter immediately after it comes out, then cover it with a plastic bag and a towel for 10 minutes to keep it very soft.
Chef Secrets
Simple tricks to make your dish special
Proper proofing is the secret to success; let the dough take its time in a warm, dark place.
The elasticity test is crucial; if the dough breaks easily, knead it a bit more.
Use the oven light as a natural heater to speed up proofing in winter.
Milk wash gives a delicate and soft golden color to the brioche.
Covering pastries immediately after baking keeps them soft for the longest possible time.
For crunch, sprinkle the sugar before the brioche cools completely so it sticks.
Kneading by hand takes effort but the result is better as you feel the dough's texture.
Serve warm with a cup of tea with milk for breakfast.
Can be served with Nutella or honey for dessert.
Serving Suggestions
A final touch for a complete meal
Serve warm with a cup of tea with milk for breakfast.
Can be served with Nutella or honey for dessert.
Frequently asked questions
Practical answers on prep, storage, and substitutions
Yes, absolutely. Once completely cooled, place in airtight bags and freeze. Reheat in the microwave whenever needed; it will be like fresh.
Keywords
Spongy Yogurt Cake (Naiti Style)
Fluffy and airy Yogurt Sponge Cake that tastes just like the classic Naiti! Master this foolproof recipe for a high-rising, soft cake perfect for your daily tea time.
Healthy Whole Wheat Toast & Petit Pain
Homemade whole wheat toast and petit pain recipe with bran, following the. Healthy, economical, dairy-free, and easy to bake.
Authentic Egyptian Koshari with All the Secrets
Learn how to make authentic Egyptian Koshari with crispy onions, savory tomato sauce, garlic vinegar Daqqa, and spicy oil like a pro.
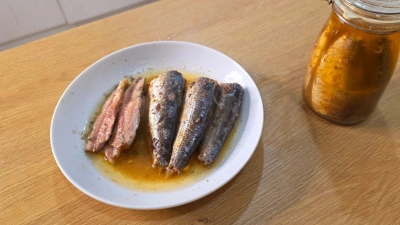
Gourmet Homemade Canned Sardines
Learn how to make professional homemade canned sardines. Tender, flavorful fish preserved in oil and garlic. A cost-effective, healthy, and preservative-free recipe.
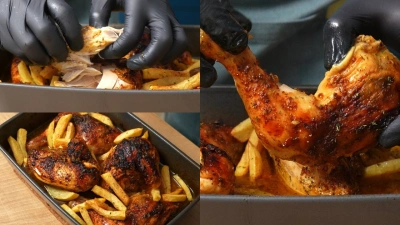
Classic Egyptian Roasted Chicken Tray
Master the Egyptian roasted chicken tray with a potent marinade and crispy skin. Discover the secret to the perfect savory sauce and juicy, butter-soft chicken.
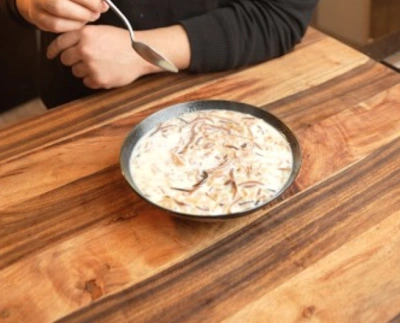
Traditional Upper Egyptian Vermicelli with Ghee and Milk
Warm up with traditional Upper Egyptian Vermicelli. A handcrafted 10-minute dessert with ghee and milk that brings authentic Egyptian comfort to your table.

Authentic Egyptian Shakshuka
Master authentic Egyptian Shakshuka! Enjoy a rich, simmered tomato and pepper sauce with perfectly cooked eggs. The ultimate flavorful breakfast ready in 25 minutes.

Authentic Kebab El Halla and White Rice with Mastic and Cardamom
Master the authentic Egyptian Kebab El Halla: tender beef in a rich caramelized onion sauce. Served with aromatic mastic and cardamom rice for a perfect meal.